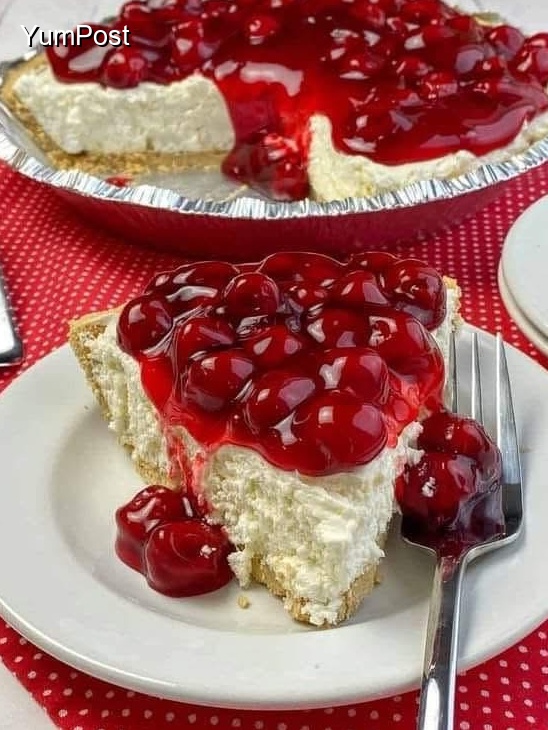
No-Bake Cherry Cheesecake – Sweet Perfection
Introduction
Get ready to make an incredible No-Bake Cherry Cheesecake that everyone will love! This recipe combines simple ingredients with great flavor to create something truly special. Perfect for any occasion, this dish is both delicious and easy to prepare.
Follow along as we show you how to make this wonderful recipe step by step!
Of course! A No-Bake Cherry Cheesecake is a classic, creamy, and refreshing dessert that’s perfect for warm days, potlucks, or when you don’t want to turn on the oven. It’s incredibly easy to make and always a crowd-pleaser.
Here is a simple, foolproof recipe with a delicious homemade touch.
No-Bake Cherry Cheesecake Recipe
Prep Time: 20 minutes
Chill Time: 4 hours (or overnight)
Total Time: 4 hours 20 minutes
Serves: 8-10
Ingredients
For the Crust
· 1 ½ cups graham cracker crumbs (about 10-12 full sheets)
· ⅓ cup granulated sugar
· 6 tablespoons unsalted butter, melted
For the Filling
· 2 (8 oz) blocks full-fat cream cheese, softened to room temperature
· 1 cup powdered sugar
· 1 teaspoon vanilla extract
· 1 (8 oz) tub frozen whipped topping (like Cool Whip), thawed OR 2 cups sweetened whipped cream*
For the Topping
· 1 (21 oz) can cherry pie filling
Instructions
- Make the Crust: In a medium bowl, mix the graham cracker crumbs and sugar. Pour in the melted butter and stir until the mixture resembles wet sand and holds together when pressed.
- Press the Crust: Firmly press the crumb mixture into the bottom and slightly up the sides of a 9-inch pie plate or springform pan. Use the bottom of a measuring cup to press it down evenly.
- Chill the Crust: Place the crust in the refrigerator to set while you make the filling.
- Make the Filling: In a large bowl, using a hand mixer or stand mixer, beat the softened cream cheese until it is completely smooth and free of lumps. This is the most important step for a silky filling!
- Add Sugar and Vanilla: Add the powdered sugar and vanilla extract to the cream cheese. Beat on medium speed until the mixture is smooth and well-combined, scraping down the sides of the bowl as needed.
- Fold in Whipped Topping: Gently fold in the thawed whipped topping (or your homemade sweetened whipped cream) using a spatula. Fold until no white streaks remain. Be gentle to keep the filling light and airy.
- Assemble: Remove the crust from the refrigerator. Spoon the cheesecake filling into the crust and smooth the top with a spatula.
- Chill Thoroughly: Cover the cheesecake with plastic wrap and refrigerate for at least 4 hours, or preferably overnight. This is essential for the cheesecake to set properly.
- Top and Serve: Just before serving, spread the cherry pie filling evenly over the top of the chilled cheesecake. Slice, serve, and enjoy!
*For Homemade Sweetened Whipped Cream: In a chilled bowl, whip 1 cup of heavy cream with 2 tablespoons of powdered sugar and 1/2 teaspoon of vanilla extract until stiff peaks form. Use this in place of the frozen whipped topping.
Tips for Success & Variations
· Room Temperature Cream Cheese is Key: This is non-negotiable! If the cream cheese is cold, you will end up with a lumpy filling. Take it out of the fridge at least 1-2 hours before you start.
· Don’t Overmix After Adding Whipped Cream: Folding gently is crucial. If you beat it, you will deflate the air and the filling won’t be as light and fluffy.
· Crust Variations: You can use other types of crumbs like crushed vanilla wafers, Oreos (remove the filling for a chocolate crust), or shortbread cookies.
· Different Toppings: While cherry is classic, feel free to use any pie filling you like, such as blueberry, strawberry, or apple. You can also top with fresh berries or a chocolate ganache.
· Flavor the Filling: Add a tablespoon of lemon juice for a bright, tangy twist. You can also fold in some lemon zest.
· Individual Servings: For easy portion control, make the cheesecake in individual jars or glasses. Simply layer the crust, then the filling, and top with cherries.
Why This Recipe is a Winner
· Incredibly Easy: No baking, no water bath, no complicated steps. It’s a simple “mix and chill” dessert.
· Light and Creamy: The texture is airy and smooth, unlike its dense, baked counterpart.
· Make-Ahead Dream: It’s the perfect dessert to make the day before a party or gathering.
· Nostalgic and Delicious: The combination of creamy cheesecake and sweet cherry topping is a timeless favorite.
Enjoy your delicious, cool, and creamy No-Bake Cherry Cheesecake
Conclusion
Congratulations on making this delicious No-Bake Cherry Cheesecake! We hope you and your loved ones enjoyed every bite of this flavorful dish. This recipe is perfect for sharing with family and friends, and we’re confident it will become a regular favorite in your kitchen.
🍽️ Looking for more amazing recipes? Browse through our collection of delicious dishes on YumPost! From quick weeknight dinners to impressive desserts, we have something for every taste and occasion.
💬 Did you love this recipe? We’d love to hear from you! Share your experience in the comments below and let us know how it turned out. Your feedback helps us create even better recipes for you!
Share This Recipe
If you enjoyed this No-Bake Cherry Cheesecake, please share it with your friends and family! Help us spread the joy of delicious homemade cooking by sharing this recipe on your favorite social media platforms. Your support means the world to us! ❤️
Don’t forget to explore more recipes on our website and discover your next culinary adventure!